วันอังคารที่ 13 ธันวาคม พ.ศ. 2559

Revit API MessageBox จาก TaskDialog

TaskDialog ถ้าไม่มี Option อะไรเลย จะเป็น Message ธรรมดา

TaskDialog.Show("Title","Message");

จะมีแค่ ปิด Dialog เท่านั้น
กรณีต้องการ "Yes", "No"
ให้เพิ่ม
 TaskDialogResult tdr=   TaskDialog.Show("วัตถุนี้เป็น Link!", "ตอบ (Yes) หรือ (No)", TaskDialogCommonButtons.Yes | TaskDialogCommonButtons.No);

         TaskDialog.Show("??",tdr.ToString());

จะได้ผล เป็น "Yes" หรือ "No"

และถ้าต้องการหลายๆ ทางเลือก
ลอง แบบนี้

TaskDialog td = new TaskDialog("Decision");
            td.MainContent = "What do you want to do?";
            td.AddCommandLink(TaskDialogCommandLinkId.CommandLink1,
                               "Use Simple Insertion Point",
                               "This option works for free-floating items");
            td.AddCommandLink(TaskDialogCommandLinkId.CommandLink2,
                                "Use Face Reference",
                                "Use this option to place the family on a wall or other surface");

            switch (td.Show())
            {
                case TaskDialogResult.CommandLink1:
                    // do the simple stuff
                    break;

                case TaskDialogResult.CommandLink2:
                    // do the face reference
                    break;

                default:
                    // handle any other case.
                    break;
            }

วันจันทร์ที่ 12 ธันวาคม พ.ศ. 2559

C# MessageBox Input Show Grid แบบง่ายๆ

ต้องการ Message Box Input แบบง่ายๆ ไม่ต้องการสร้าง Form ต่อ ท้าย ใน Class ที่กำลังทำอยู่
เวลาเรียกใช้ ก็

String ins=InputPrompt.ShowDialog("Hello","Question"," default");


 public static class InputPrompt
    {
        public static string ShowDialog(string text, string caption,string defText)
        {
            Form prompt = new Form()
            {
                Width = 500,
                Height = 150,
                FormBorderStyle = FormBorderStyle.FixedSingle,
                Text = caption,
                StartPosition = FormStartPosition.CenterScreen
            };
            Label textLabel = new Label() { Left = 50, Top = 20, Text = text };
            TextBox textBox = new TextBox() { Left = 50, Top = 50, Width = 400 };
            Button confirmation = new Button() { Text = "Ok", Left = 350, Width = 100, Top = 70, DialogResult = DialogResult.OK };
            confirmation.Click += (sender, e) => { prompt.Close(); };
            prompt.Controls.Add(textBox);
            prompt.Controls.Add(confirmation);
            prompt.Controls.Add(textLabel);
            prompt.AcceptButton = confirmation;
            if (defText != null) textBox.Text = defText;
            return prompt.ShowDialog() == DialogResult.OK ? textBox.Text : "";
        }

    }

เพิ่มสำหรับ แสดง DataTable บน DataGridView
           public static string GridDialog(string caption, object dt)
            {
                System.Windows.Forms.Form prompt = new System.Windows.Forms.Form()
                {
                    Width = 500,
                    Height = 500,
                    FormBorderStyle = FormBorderStyle.FixedSingle,
                    Text = caption,
                    StartPosition = FormStartPosition.CenterScreen,   
                    AutoSizeMode=AutoSizeMode.GrowAndShrink
                    
                };
              
                DataGridView dv = new DataGridView() { Left = 1, Top = 1, Width = 400,Height =400 };
                Button confirmation = new Button() { Text = "Ok", Left = 350, Width = 100, Top = 70, DialogResult = DialogResult.OK };
                //Anchor: Top,Left
                //AutoSizeColumn: Fill
                //Dock: Fill
                dv.Dock = DockStyle.Fill;
                dv.AutoSize = true;
                dv.Anchor = AnchorStyles.Top | AnchorStyles.Left;
                prompt.Controls.Add(dv);
                prompt.Controls.Add(confirmation);
                
                prompt.AcceptButton = confirmation;
                dv.DataSource = dt; // can be datatable , List
                prompt.ShowDialog();
                return"";

            }
// ในกรณี Linq ต้องการแสดงผลบน Grid ต้องใส่ toList() ด้วย
    var result = dt.Rows.Cast<DataRow>()

                    .Select(row=> new{ key= row["BomID"].ToString(),data= row["ChildID"].ToString()}).ToList();

วันศุกร์ที่ 11 พฤศจิกายน พ.ศ. 2559

Revit API แปลง Units


แปลงจาก ฟุต เป็น เมตร 

double asMeter = UnitUtils.Convert(cl.Width, DisplayUnitType.DUT_DECIMAL_FEET, DisplayUnitType.DUT_METERS);

แสดง Unit ปัจจุบันใน Document

Units units = doc.GetUnits();
            string outStr = "";
            IList<UnitType> unitTypes = UnitUtils.GetValidUnitTypes();

          uL= unitTypes.Where(x => x.ToString() == "UT_Length").First();
         FormatOptions fmtOpts = units.GetFormatOptions(ut);
         string du = fmtOpts.DisplayUnits.ToString();

วันศุกร์ที่ 4 พฤศจิกายน พ.ศ. 2559

การอ่านค่าจาก Schedule API ใน Revit

Schedule API เป็น ส่วนที่เพิ่มเติมมาใหม่ใน Revit API 2014 โดยที่ผู้ใช้งาน สามารถ อ่านค่า จาก View มาได้ ทั้งชื่อชอง View และ Table ของ ตาราง

ViewSchedule จะเป็น class ลูกจาก View  โดยตารางจะอยู่ใน TableData ข้อมูล จะอยู่ใน
ชื่ออยู่ใน currentView.Name
SectionType.Body


ตัวอย่างนี้ จะออกเป็น CSV format

 View currentView = uDoc.ActiveView;

string vName = currentView.Name;  // Schedule name
            ViewSchedule vs = currentView as ViewSchedule;
            TableData vd = vs.GetTableData();
            TableSectionData tds = vd.GetSectionData(SectionType.Body);
            int rCount = tds.NumberOfRows;
            int rCol = tds.NumberOfColumns;
            string allSchAll = "";
            for (int i = 0; i < rCount; i++)
            {
                string sLine = "";
                for (int j = 0; j < rCol; j++)
                {
                    sLine += tds.GetCellText(i, j)+",";
                }
                allSchAll += sLine;
            }

            TaskDialog.Show("data", allSchAll);

วันพฤหัสบดีที่ 3 พฤศจิกายน พ.ศ. 2559

การสร้าง Form ใน DDD ใน Revit

กรณีที่ต้องการ Form ของ c# ใน Revit ของ DDD ทำได้โดยการ Mouse ขวา และ Add Form ใหม่เข้าไปใน Solution

สร้าง Form โดย double click ที่ Form แล้ว Design ตามใจ

แล้วใน โปรแกรม หลัก ของ การเรียกเช่น Class1.cs
เพิ่ม Method ที่จะเรียก (callElemCat เป็นสมมติ)

หลังบรรทัด
using...
ให้เติม ชื่อของ Form ตามนี้ และ ใส่ .Designer.cs ด้วย

//css_import elemCatForm1.cs
//css_import elemCatForm1.Designer.cs

namespace RevitHello
{
    public class Class1
    {

// คำสั่งที่จะเรียกอยู่ที่นี้
        public static void callElemCat(ExternalCommandData commandData)
        {
            elemCatForm1 myform = new elemCatForm1();
            if (myform.ShowDialog == System.Windows.Forms.DialogResult.OK)
            {
                // ..process here
            }

        }
// จบคำสั่ง


เรียก DDD ใน Revit ก็ได้ Form


กรณีที่ จะให้ Form มี คำสั่ง ของ Revit ก็ using Autodesk.Revit... ตามปรกติ


วันเสาร์ที่ 24 กันยายน พ.ศ. 2559

การปะหน้าหลังสำหรับ Text ในการทำ command Line Database

คำสั่ง database มักจะเป็น commandline เช่นทำงาน ในรูปของ .bat หรือ .cmd ที่อาจจะต้อง Attach คำสั่ง ปะหัวปะท้าย  จาก คำสั่ง เดิม สร้าง Project จาก Commandline ใน visual Studio หรือ Shapedevelop ก็ได้

  static void Main(string[] args)
        {
            if (args.Length <2 )
            {
                Console.WriteLine("Add text to front and back, AFrontBacktxt inputFile <front> <back> > output");
               Console.WriteLine("use null for not have data");
                return;
            }
            string filename = args[0];
            string frontCmd = args[1];
            string backCmd = "null";
            if (args.Length > 2)
            {
                backCmd = args[2];
            }
            StreamReader sr = new StreamReader(filename);
            string data = sr.ReadToEnd();
            sr.Close();
            string[] dataline = data.Split('\n');
            foreach (string s in dataline)
            {
                if (s.Length == 0 || s.Trim()=="") continue;
                string s_R= s.Replace("\r","").Replace("\"","").Trim();
                string outS= s_R;
                if(frontCmd!="null"){
                   outS= frontCmd.Replace("\"","")+" "+outS;
                }
                if(backCmd!="null"){
                  outS= outS+" "+backCmd.Replace("\"","");
                }
                Console.WriteLine(outS);
            }
        }

    }

วันเสาร์ที่ 27 สิงหาคม พ.ศ. 2559

การสร้าง Element บน Autodesk Robot Structure

Autodesk Robot Structure เป็นโปรแกรม ออกแบบ และคำนวนโครงสร้าง โปรแกรมมี Dotnet ที่สามารถเขียนโปรแกรม ในการสร้าง Model ได้พอสมควร
โดยต้องทำการ Reference RobotOM.dll ใน Robot ก็จะเขียนโปรแกรมได้
ในตัวอย่างเป็นการสร้าง Node และ สร้าง Bar  รวมทั้ง สร้าง Support
โดยการสร้าง โปรแกรมจะต้องสร้าง เป็น Application Form และทำการทำงาน เป็น Com ทำงานไปพร้อมกับเปิด Robot คนละ Task กัน
Robot API จะเป็นแบบ Com และ reference จะใช้ เป็นเลขที่เช่น Node number , Bar number ซึ่งก็ง่ายสำหรับการเขียนโปรแกรม

 private void button2_Click(object sender, EventArgs e)
        {
            RobotApplication robapp = new RobotApplication();
            robapp.Project.New(IRobotProjectType.I_PT_FRAME_3D);
            RobotStructure s = robapp.Project.Structure;
            s.Nodes.Create(1, 0, 0, 0); // สร้าง Node
            s.Nodes.Create(2, 0, 0, 1); 
            s.Nodes.Create(3, 1, 0, 1); 
            s.Nodes.Create(4, 1, 0, 0);
            for (int i = 1; i < 4; i++)
            {
                s.Bars.Create(i, i, i + 1); //สร้าง Bar
            }
            // create support
            doInsSupport(robapp, 1); // สร้างSupport
            doInsSupport(robapp, 4);
           
        }

        private void doInsSupport(RobotApplication robapp, int p)
        {

            IRobotNode node = (IRobotNode)robapp.Project.Structure.Nodes.Get(p);
            node.SetLabel(IRobotLabelType.I_LT_SUPPORT, "Fixed");

        }

วันศุกร์ที่ 10 มิถุนายน พ.ศ. 2559

การใช้ swig ในการเชื่อม Ruby (Sketchup)กับ C++

SWIG เป็น opensource ที่ใช้สำหรับการเชื่อมภาษา ที่ต่างกัน เนื่องจากการพัฒนาระหว่าง programmer ระหว่างโครงการ และ โปรแกรมเก่า จะมีความแตกต่างภาษา และระยะเวลาในการพัฒนาต่างกัน เพื่อไม่ให้ลงทุนใหม่ จึงเป็นการที่ดีในการเชื่อมการเขียนโปรแกรมแบบ Painless ดีที่สุด ในการนี้ ต้องการเขียนโปรแกรม Dotnet เช้ากับ Ruby ของ Sketchup จะเป็นทางที่ง่ายกว่า การ Code ไปตรงๆ การเชื่อม Ruby
หลักการ ของ SWIG จะเป็น Code Generator โดยจะสร้าง C++ หรือ C โปรแกรม source เป็น Class Wrapper

     [Ruby,Python,PHP,Java..] <--- > Wrapper Class (c, c++) <---> [C#,Java,..]

โดยการทำงานสามารถเป็นการติดต่อแบบ 2 ทาง ได้

ในการใช้กับ Sketchup จำเป็นต้องรู้ว่า Ruby ที่ใช้อยู่ เป็น Version ใหน
ถ้าเป็น Sketchup 8 จะเป็น Ruby 1.8 ถ้าเป็น version 2014-2016 จะเป็น Ruby 2.0
Source ในการ Compile จะต่าง กัน
ตัวอย่างเช่น ต้องการเชื่อม Ruby กับ C++ Class โดยไม่ต้องทำ Interface อะไรเลย

class Shape {
public:
  Shape() {
    nshapes++;
  }
  virtual ~Shape() {
    nshapes--;
  };
  double  x, y;   
  void    move(double dx, double dy);
  virtual double area(void) = 0;
  virtual double perimeter(void) = 0;
  static  int nshapes;
};

class Circle : public Shape {
private:
  double radius;
public:
  Circle(double r) : radius(r) { };
  virtual double area(void);
  virtual double perimeter(void);
};

class Square : public Shape {
private:
  double width;
public:
  Square(double w) : width(w) { };
  virtual double area(void);
  virtual double perimeter(void);
};

ใน Ruby ต้องการ เขียน เข้าไป Access Class ของ C++ ตรงๆ


c = Example::Circle.new(10)
s = Example::Square.new(10)

print "\nA total of #{Example::Shape.nshapes} shapes were created\n"

# ----- Member data access -----
# Set the location of the object

# Notice how we can do this using functions specific to
# the 'Circle' class.
c.x = 20
c.y = 30

# Now use the same functions in the base class
s.x = -10
s.y = 5

print "\nHere is their current position:\n"
print "    Circle = (", c.x, ",", c.y, ")\n"
print "    Square = (", s.x, ",", s.y, ")\n"

# ----- Call some methods -----

print "\nHere are some properties of the shapes:\n"
for o in [c, s]
  print "    #{o}\n"
  print "        area      = ", o.area, "\n"
  print "        perimeter = ", o.perimeter, "\n"
end

การเชื่อมต่อ ระหว่างRuby กับ C++ใช้ Swig ทำได้โดยสร้าง Interface file


/* File : example.i */
%module example

%{
#include "example.h"
%}

/* Let's just grab the original header file here */
%include "example.h"


การเรียกใช้ Swig เพื่อสร้าง Class Wrapper
swig.exe -c++ -ruby sample.i

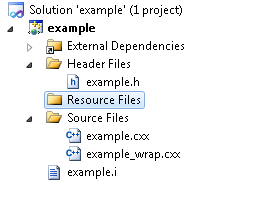
จะสร้าง file output -> sample_wrapper.cxx , .hxx ให้ นำไปใส่ใน Project Explorer
จะเป็น Interface file ให้ compile ด้วย Visual studio 2012,2013 

สำหรับ Header และ Library Download ตามนี้

https://github.com/thomthom/ruby-c-extension-examples/tree/VS2013/ThirdParty/include/ruby/2.0/win32

http://www.swig.org/download.html

ตัวอย่างการ Run  ใช้การ load Code ของ Ruby 


วันอาทิตย์ที่ 8 พฤษภาคม พ.ศ. 2559

พื้นที่ของ Ramp

ใช้ dynamo คำนวนพื้นที่ผิวของ Ramp ทางลาด ให้ใช้ ค่า List ที่ [0] จะเป็นผิวบนของ Ramp อย่าลืมเป็น ตารางฟุต นะ

วันอังคารที่ 26 เมษายน พ.ศ. 2559

การ Export Schedule

ในการส่งค่าไปทำการนับวัสดุ หรือ การวางแผนการก่อสร้าง มักจะต้องส่งข้อมูลไป ระบบอื่น ที่เป็นฐานข้อมูล Database การส่ง Text File โดยใช้ Tab เป็นตัวขั้น เป็นระบบที่ง่ายที่สุด

 public static void expSchedule(ExternalCommandData commandData)
        {

            UIApplication uiapp = commandData.Application;
            UIDocument uidoc = uiapp.ActiveUIDocument;
            Autodesk.Revit.DB.Document doc = uidoc.Document;
            string _export_folder_name = "c:/tmp/shedule";
            FilteredElementCollector col
              = new FilteredElementCollector(doc)
                .OfClass(typeof(ViewSchedule));
         // สร้าง List ในการเลือก เมื่อมีหลายตาราง
           List<string> ps =new List<string>();
            foreach (ViewSchedule vs in col)
            {
                ps.Add(vs.Name);
            }
       // เลือก และ ส่งออก ในชื่อ out1.txt
            int idx=PPGenInput.ppSelectItem.doShow(ps.ToArray(), "Select Schedule");
            if (idx >= 0)
            {  

                ViewSchedule vs = (ViewSchedule)col.Where(x => (x.Name == ps[idx])).First();
                ViewScheduleExportOptions opt = new ViewScheduleExportOptions(); 
                Directory.CreateDirectory( _export_folder_name);
                vs.Export(_export_folder_name,  "out1.txt", opt);
             
            }
        
        }

วันพฤหัสบดีที่ 21 เมษายน พ.ศ. 2559

การอ่านค่า วัสดุใน Revit Family

วัตถุใน Revit เช่น ประตู หน้าต่าง ล้วนเป็น Family ที่สร้างมา โดยที่ใน Family สามารถ ระบุวัสดุได้ สำหรับงาน ประมาณราคา ต้องการ วัสดุ เพื่อการ คำนวน ปริมาณ สารามารถ ทำได้ โดย เปิด Family นั้น และ ทำการ Explore เข้าไป

public static void look_FamilyInstance(FamilyInstance familyInstance)
{
    string message = "FamilyInstance : ";
  
    // ถ้ามี Host เช่น Rebar บอก Host ด้วย
    if (familyInstance.Host != null)
    {
        message += "\nFamilyInstance host name is : " + familyInstance.Host.Name;
    }

    foreach (ElementId materialId in familyInstance.GetMaterialIds(false))
    {
        Material material = familyInstance.Document.GetElement(materialId) as Material;
        message += "\nFamilyInstance e material : " + material.Name;
    }
    // มี ห้อง บอกด้วย
    if (familyInstance.Room != null)
    {
        message += "\nFamilyInstance room name is : " + familyInstance.Room.Name;
    }

    // Get FamilyInstance structural type
    message += "\nFamilyInstance structural type is : " + familyInstance.StructuralType;

    // Get FamilyInstance structural usage
    message += "\nFamilyInstance structural usage is : " + familyInstance.StructuralUsage;

    TaskDialog.Show("Revit",message); // แสดงผล
}

สำหรับ การเรียก Fuction นี้ อย่าลืม Casting ด้วย

    FamilyInstance fi = (FamilyInstance) doc.GetElement(elementId);
    look_FamilyInstance(fi);


วันศุกร์ที่ 19 กุมภาพันธ์ พ.ศ. 2559

การทำองค์ประกอบ อาคารด้วย Onshape ฟรี

ออกแบบ 3มิติด้วย Onshape ฟรี

Onshape.com

โลกบน Cloud มาเร็วมาก ขอแนะนำสำหรับ ผู้ที่ใช้ Solidwork Inventor .. ที่เคยใช้ parametric feature base ตอนนี่มี โปรแกรม ฟรี บน web window, mac ,  Iphone , ipad, Andriod tablet. ชื่อ Onshape 
เป็น team solidwork เก่า โดยมี หลักว่า ฟรี ถ้าทำ part เป็น public และเป็นส่วนตัว ได้ 10 ชิ้น แต่ถ้า จ่าย 99 usd ต่อเดือนไม่จำกัด
โปรแกรม Export ได้ stl สำหรับ 3d print และหลาย format สำหรับ autocad, Revit


วันพฤหัสบดีที่ 14 มกราคม พ.ศ. 2559

การล้าง License ของ Autocad หรือ Revit เวลา เครื่องติด Virus (ต้องขอ License ใหม่)

มีปัญหาสำหรับเครื่องที่ติด virus ทำให้ License ของ Autocad หรือ Revit Error เปิด Run ไม่ได้ การล้าง
ให้เข้าไปที่
C:\programdata\Flexnet\
ค้น cmd.exe
c:
cd \programdata\Flexnet

โดย ทำการลบ ทั้งหมด โดย del *.*
หรือ ใช้ Explorer ก็ได้ เลือก File ทั้งหมด และกดที่ ปุ่ม [delete]
จากนั้น ไปทำการ Activate ใหม่