วันจันทร์ที่ 4 ธันวาคม พ.ศ. 2560

การแสดงค่า ใน List Box ใช้Dictionary เป็น Datasource

การใช้ ListBox Datasource เพื่อความง่ายใช้ Dictionary ในการเลือก TitleBox สำหรับ Sheet ใน Revit


FilteredElementCollector collector = new FilteredElementCollector(doc);
                collector.OfCategory(BuiltInCategory.OST_TitleBlocks);
                collector.WhereElementIsElementType();

                //Get ElementId of first title block type.

Dictionary<string,ElementId> datas = 
collection.AsEnumerable().ToDictionary(x=>x.ToString(),y=>y);

listBox1.DataSource = new BindingSource(datas, null); 
listBox1.DisplayMember = "Value"; 
listBox1.ValueMember = "Key"; 

เมื่อเลือก ที่ Selection 
จะเป็น SelectedValue แต่ต้อง ใช้ เป็น 

ElementId id =SelectedValue as ElementId;

วันจันทร์ที่ 27 พฤศจิกายน พ.ศ. 2560

การจับเวลาใน การทำงาน คำนวนหรือ ทดสอบอัลกอริกทึม

ปัญหาของการทำงาน Data ขนาดใหญ่ อาจจะเกิด ปัญหา ของ การคำนวน ใช้เวลา แบบ 2ยกกำลัง n ตามจำนวน Data ได้ บางครั้ง เพื่อต้องการ ทดสอบจับเวลา ใช้ DateTime และ TimeSpan ใน Dotnet

ในกรณีดูเวลา ใช้ เวลาวินาทีของ วัน(เราคงไม่ทำข้ามวัน)


   logMsg("End at:"+DateTime.Now.TimeOfDay.TotalSeconds.ToString("0.##"));

กรณี ดู เริ่มและสิ้นสุด

 // start timer
            DateTime sttime = DateTime.Now;
            doComputingHere();
            DateTime endTime = DateTime.Now;
            string diff = ((endTime - sttime).TotalSeconds).ToString("0.##");
            logMsg("Run time(s):" + diff);

วันอาทิตย์ที่ 12 พฤศจิกายน พ.ศ. 2560

Revit เลือกวัตถุ 2 ครั้ง PickObject

ทดลอง Print Id ของ Object ที่เลือก 2 ครั้ง ใช้ PickObject แต่ uiDoc.Selection  -> ตัวแปร r ใน วงเล็บ จะเป็นคนละตัว

public static void test2Pick(ExternalCommandData commandData)
        {
            UIApplication uiApp = commandData.Application;
            UIDocument uiDoc = uiApp.ActiveUIDocument;
            var app = uiApp.Application;
            Document doc = uiDoc.Document;
            ElementId id1=null;
            ElementId id2=null;

            string str = "2 Id=";
            // Select something to use as base bounding box.
            {
                Reference r = uiDoc.Selection.PickObject(Autodesk.Revit.UI.Selection.ObjectType.Element);
                id1 = r.ElementId;
                str += id1.ToString()+"\n";
            }
            {
                Reference r = uiDoc.Selection.PickObject(Autodesk.Revit.UI.Selection.ObjectType.Element);
                id2 = r.ElementId;
                str += id2.ToString();
            }
            MessageBox.Show(str);

        }

แสดง Family ทั้งหมดใน Project File

เป็นการใช้ FilteredElementCollector .OfClass จะค้นอะไรให้ทำตรงนี้

  public static void listAllFamilies(ExternalCommandData cmd)
        {
 UIApplication uiapp = cmd.Application;
            UIDocument uidoc = uiapp.ActiveUIDocument;
            Autodesk.Revit.ApplicationServices.Application app = uiapp.Application;
            Autodesk.Revit.DB.Document doc = uidoc.Document;

            FilteredElementCollector collector = new FilteredElementCollector(doc).OfClass(typeof(Family));
            string str = "";
            foreach (var item in collector)
            {

                str+=item.Name+"\n";

            }
            TaskDialog.Show("??",str);

        }

วันอาทิตย์ที่ 1 ตุลาคม พ.ศ. 2560

หาพิกัดของDuct หรือ ท่อ

Duct และ ท่อ เป็น Element ใน MEP การหาจุดเริ่มต้นและสิ้นสุด ต้องทำให้เป็น Curve ก่อน

  public static void getDuctPoint(ExternalCommandData commandData)
        {
                UIApplication uiapp = commandData.Application;
                UIDocument uidoc = uiapp.ActiveUIDocument;
                Document doc = uidoc.Document;
                string dbg = "";
                FilteredElementCollector allDuct
                  = new FilteredElementCollector(doc)
                    .OfClass(typeof(Duct));

                int nDucts = 0;
                int nCurves = 0;

                foreach (Duct aDuct in allDuct)
                {
                    ++nDucts;

                    LocationCurve lc = aDuct.Location as LocationCurve;

                    if(null == lc) dbg= "No Duct!";

                    if (null != lc)
                    {
                        ++nCurves;

                        Curve c = lc.Curve;

                       dbg+=string.Format("Duct {0} from {1} to {2}",
                          aDuct.Id.IntegerValue,
                          c.GetEndPoint(0).ToString(),
                          c.GetEndPoint(1).ToString());
                    }
                }
                TaskDialog.Show("??", dbg);
                //return Result.Succeeded;

         }

วันเสาร์ที่ 30 กันยายน พ.ศ. 2560

ระยะสั้นที่สุด ระหว่าง Line

เป็น การคำนวน ด้วยวิธี Vector หาระยะสั้นที่สุดระหว่าง Line

 public static double dist3D_Line_to_Line(Line L1, Line L2)
        {
            XYZ u = L1.GetEndPoint(1) - L1.GetEndPoint(0);
            XYZ v = L2.GetEndPoint(1) - L2.GetEndPoint(0);
            XYZ w = L1.GetEndPoint(0) - L2.GetEndPoint(0);
           
            double a = u.DotProduct( u);         // always >= 0
            double b = u.DotProduct(v);
            double c = v.DotProduct( v);         // always >= 0
            double d = u.DotProduct( w);
            double e = v.DotProduct( w);
            double D = a * c - b * b;        // always >= 0
            double sc=0;
           double tc=0;
            double SMALL_NUM = 0.000001;
            // compute the line parameters of the two closest points
            if (D < SMALL_NUM)
            {          // the lines are almost parallel
                sc = 0.0;
                tc = (b > c ? d / b : e / c);    // use the largest denominator
            }
            else
            {
                sc = (b * e - c * d) / D;
                tc = (a * e - b * d) / D;
            }

            // get the difference of the two closest points
            XYZ dP = w + (sc * u) - (tc * v);  // =  L1(sc) - L2(tc)

            return dP.GetLength();   // return the closest distance

        }

สร้าง Sheet ด้วย List ใน Revit

สร้าง Sheet ใน Revit ด้วย List ดูใน datas


  public static void createSheetList(ExternalCommandData cmd)
        {
            UIApplication uiapp = cmd.Application;
            UIDocument uidoc = uiapp.ActiveUIDocument;
            Autodesk.Revit.ApplicationServices.Application app = uiapp.Application;
            Autodesk.Revit.DB.Document doc = uidoc.Document;
            string[] datas = {"1,sheet1","2,sheet2","3,sheet3" };
            
            
                FilteredElementCollector collector = new FilteredElementCollector(doc);
                collector.OfCategory(BuiltInCategory.OST_TitleBlocks);
                collector.WhereElementIsElementType();
                //Get ElementId of first title block type.
                ElementId titleBlockId = collector.FirstElementId();
              using(  Transaction t = new Transaction(doc, "Create Sheets"))
              {
                t.Start();
                foreach(string csvLine in datas)
                {
                    char[] separator = new char[] { ',' };
                    string[] values = csvLine.Split(separator, StringSplitOptions.None);
                    // Make sure both values are valid
                    if (values[0] != null && values[0].Length > 0 && values[1] != null && values[1].Length > 0)
                    {
                        ViewSheet sheet = ViewSheet.Create(doc, titleBlockId);
                        sheet.Name = values[1];
                        sheet.SheetNumber = values[0];
                    }
                }
                t.Commit();
              }

         }

วันอังคารที่ 26 กันยายน พ.ศ. 2560

อ่าน Paint Material จาก Wall

อ่านค่า Paint ที่ระบายบนกำแพง


  public static string getPaintWallFaces(ElementId wallId,Document doc)
        {
            Element wall = doc.GetElement(wallId);
            GeometryElement geometryElement = wall.get_Geometry(new Options());
            string str= "";
            foreach (GeometryObject geometryObject in geometryElement)
            {
                if (geometryObject is Solid)
                {
                    Solid solid = geometryObject as Solid;
                    foreach (Face face in solid.Faces)
                    {
                        if (doc.IsPainted(wallId, face))
                        {
                            ElementId mid = doc.GetPaintedMaterial(wallId, face); 
                           Material mel = doc.GetElement(mid) as Material;
                            str+=mel.Name+"\n";
                        }
                    }
                }
            }
            return str;
        }

Debug โปรแกรม C# เมื่อ Run ด้วย DDD

การเรียกโปรแกรม ทำงาน ด้วย DDD ทำได้เป็น Pre-Compiled Mode ทำได้ ทันที โดยไม่ต้อง Load หรือเข้าโปรแกรม Revit ใหม่ ก็สามารถใช้ TaskDialog เพื่อการแสดงค่า ที่ไม่ทราบได้ แต่บางครั้ง จำเป็นต้อง ให้ ทำการ แสดงค่า Watch ระหว่างทำงาน สามารถใช้ Visual Studio ที่กำลังเขียน Code อยู่ Debug ได้
วิธีการ

เลือกที่ Debug และ เลือก Attach To Process -

เลือก Revit.Exe
และ ไปที่ Source code ทดลอง Click ที่หน้าบรรทัด จะเป็น จุดสีแดง หมายถึง Break line 


กลับไป Run คำสั่ง ใน หน้า Revit ->Addins->DDD และเรียกคำสั่งที่ต้องการ Debug จะเห็นว่าโปรแกรมจะหยุดที่บรรทัดนี้ เอา Mouse ไปวางที่ตัวแปร ก็จะแสดงค่า ตัวแปรออกมา ถ้าต้องการไ ปต่อ ก็กดที่ Continue (F5) ถ้าต้องการไปบรรทัดต่อไป ก็กด (Step Over F11)


หาวัตถุที่ ตัดกันโดยใช้ BoundingBox ใน Revit

การหาวัตถุที่ตัดกันใน Revit แบบเร็วๆ ใช้ Bounding Box หรือ ขนาดกล่องที่ใส่วัตถุ นั้นเช่นกำแพง เสา และเช็คว่าตัดกับ วัตถุอะไร แบบประมาณการ เมื่อได้แล้วค่อยไปเช็กอีกที่ว่าตัดกันจริงหรือไม่

// check intersection by box
        public static void chkInterBound(  ExternalCommandData commandData)
        {
            UIApplication uiApp = commandData.Application;
            UIDocument uiDoc = uiApp.ActiveUIDocument;
            var app = uiApp.Application;
            Document doc = uiDoc.Document;

            // Select something to use as base bounding box.

            Reference r = uiDoc.Selection.PickObject( Autodesk.Revit.UI.Selection.ObjectType.Element);

            // Find the bounding box from the selected 
            // object and convert to outline.
            Element Er = doc.GetElement(r.ElementId);
            BoundingBoxXYZ bb = Er.get_BoundingBox( doc.ActiveView);

            Outline outline = new Outline(bb.Min, bb.Max);

            // Create a BoundingBoxIntersectsFilter to 
            // find everything intersecting the bounding 
            // box of the selected element.

            BoundingBoxIntersectsFilter bbfilter
              = new BoundingBoxIntersectsFilter(outline);

            // Use a view to construct the filter so we 
            // get only visible elements. For example, 
            // the analytical model will be found otherwise.

            FilteredElementCollector collector
              = new FilteredElementCollector(
                doc, doc.ActiveView.Id);

            // Lets also exclude the view itself (which 
            // often will have an intersecting bounding box), 
            // and also the element selected.

            ICollection<ElementId> idsExclude
              = new List<ElementId>();

            idsExclude.Add(r.ElementId);

            // No need for this, BoundingBoxIntersectsFilter 
            // excludes all objects derived from View, as 
            // pointed out by Jim Jia below:
            //
            //idsExclude.Add( doc.ActiveView.Id );

            // Get the set of elements that pass the 
            // criteria. Note both filters are quick, 
            // so order is not so important.

            collector.Excluding(idsExclude)
              .WherePasses(bbfilter);

            // Generate a report to display in the dialog.

            int nCount = 0;
            string report = string.Empty;
            foreach (Element e in collector)
            {
                string name = e.Name;

                report += "\nName = " + name
                  + " Element Id: " + e.Id.ToString();

                nCount++;
            }

            TaskDialog.Show(
              "Bounding Box + View + Exclusion Filter",
              "Found " + nCount.ToString()
              + " elements whose bounding box intersects\n"+
              report);

           
        }

วันจันทร์ที่ 25 กันยายน พ.ศ. 2560

เขียน Model Line ใน Revit

Model Line จำเป็นต้องใช้ในบางงาน ที่ต้องการบอก เป็นเส้น เช้น Boundary หรือ Wire ที่ไม่มี Model

Source

// about line in revit
        public static void drawMline(ExternalCommandData commandData)
        {
            UIApplication uiapp = commandData.Application;
            UIDocument uidoc = uiapp.ActiveUIDocument;
            Autodesk.Revit.ApplicationServices.Application app = uiapp.Application;
            Autodesk.Revit.DB.Document doc = uidoc.Document;
            XYZ p1 = new XYZ();
            XYZ p2= p1.Add(new XYZ(5,5,0));
            using (Transaction tr = new Transaction(doc, "MLINE"))
            {
                tr.Start();
                CreateModelLine(doc, p1, p2);
                tr.Commit();
            }
        }

      public static void CreateModelLine( Autodesk.Revit.DB.Document doc,XYZ p, XYZ q)
        {
            if (p.Equals(q))
            {
                throw new ArgumentException(
                  "Expected two different points.");
            }
            Line line = Line.CreateBound(p, q);     //_app.NewLine(p, q, true);
            if (null == line)
            {
                throw new Exception(
                  "Geometry line creation failed.");
            }

            doc.Create.NewModelCurve(line,NewSketchPlanePassLine(doc,line));
        }
      public static SketchPlane NewSketchPlanePassLine(Autodesk.Revit.DB.Document doc, Line line)
      {
          XYZ p = line.GetEndPoint(0);
          XYZ q = line.GetEndPoint(1);
          XYZ norm;
          if (p.X == q.X)
          {
              norm = XYZ.BasisX;
          }
          else if (p.Y == q.Y)
          {
              norm = XYZ.BasisY;
          }
          else
          {
              norm = XYZ.BasisZ;
          }
          Plane plane = doc.Application.Create.NewPlane(norm, p);

          return SketchPlane.Create(doc, plane);

      }

วันพฤหัสบดีที่ 17 สิงหาคม พ.ศ. 2560

คำสั่งแปลง File pdf เป็น PNG

ให้ download ghostscript  (32bit ก็ได้)และติดตั้ง
คำสั่งที่ใช้ได้ สำหรับ การเปลี่ยน PDF เป็น PNG  ง่ายๆ

..\bin\gswin32c.exe -dBATCH -dNOPAUSE -sDEVICE=png16m -dGraphicsAlphaBits=4 -dTextAlphaBits=4 -r150 -sOutputFile=out%%03d.png annots.pdf

วันเสาร์ที่ 5 สิงหาคม พ.ศ. 2560

ทดสอบสร้าง CAD ด้วย GDI+

Microsoft ออก Dotnet GDI + มานานแล้วพี่งจะลอง พบว่า สร้าง CAD ได้ง่ายมาก โดยใช้ Linq ช่วยเป็น Database พบว่า ทำให้สร้าง CAD เฉพาะงาน ได้ แต่กิน Ram พอสมควร (คิดว่าไม่มากตอนนี้ ถ้าใช้ Win10 ก็ควรจะมี 8 Gb)

วันศุกร์ที่ 4 สิงหาคม พ.ศ. 2560

ขั้นตอน ของ MEP

จะเขียนแบบ ท่อ
1. ต้อง ใช้ Template Pumping
2. ใช้ Link Revit File ที่เป็น Architech
3. กรณีต้องการ Level ให้มาด้วย ต้อง Collaborate->copy/monitor
   select link -> copy ที่เส้นอีกที
4. ไปรูปแปลน View->FloorPlan เช่น footing ตั้งค่า Offset และ เขียนเส้นท่อ ถ้า
  ต้องการ ขึ้น บน ก็ให้ ไปรูปด้าน


ของแบบไฟฟ้า
1. ต้องใช้ Template EE
2. Link File
3. ไป View->FloorPlan Level 1
4. เปิด System Browser (F9)
5. วาง หลอดไฟ สวิทย์ ตู้ไฟ
6. สร้าง Circuit จาก วาง Mouse ที่ หลอดไฟ  จะเห็น Power กับ Switch
   Swich จะเชื่อม Switch กับ หลอด Power จะสร้าง สาย กับ หลอด โดยกด Tab เป็น สีเหลี่ยม
ดูใน Sytem Browser จะมี Circuit ใหม่
กด Edit เพิ่ม สวิทย์
และจะเห็น ให้สร้าง Circuit
เลือก Panel ให้เลือก ที่ แถบ ระวัง Panel ต้อง มี Power Rating ตรงกับ หลอด และ สาย


วันพฤหัสบดีที่ 27 เมษายน พ.ศ. 2560

กัน Loop ใน Autocad api

กด ESC แล้ว หลุด จากโปรแกรม
    if (HostApplicationServices.Current.UserBreak())
                        throw new Autodesk.AutoCAD.Runtime.Exception(

                            ErrorStatus.UserBreak, "ESCAPE pressed");

วันพฤหัสบดีที่ 20 เมษายน พ.ศ. 2560

debug แบบ Attach Visual studio 2013 บน Win10

ในการ Debug ต้อง แก้ options ใน VS2013

"Use Managed Compatibility Mode" and is found in the Tools -> Options -> Debugging

วันพฤหัสบดีที่ 16 มีนาคม พ.ศ. 2560

เช็คว่า มี Column ที่ต้องการใน SQLServer Table หรือเปล่า

ในการ Insert Record เข้าใน ตาราง ต่าง Version ต้องการ เช็กว่ามี Column หรือ เปล่าให้ใช้

SELECT  name
    FROM sys.columns 
    WHERE Name      = N'anyColumn'

      AND Object_ID = Object_ID(N'Temptbl')

และ Check ว่า Record Cout >0 หรือ ไม่

วันศุกร์ที่ 17 กุมภาพันธ์ พ.ศ. 2560

โปรแกรม Linq กับ SQLite DataTable queryใน Visual Studio

วิธีใช้ Linq สำหรับ การ Connect กับ SQLite ใน Visual studio

กระบวนการ
1. ใน SQLite สร้าง Database และ Table ก่อน โดยใช้ SQLiteStudio ต้องใช้ Version 2,1 เท่านั้น

2. จด ชื่อ File กับ Table ใว้

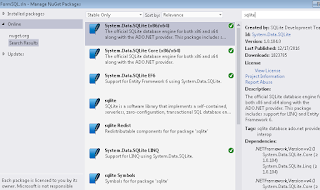
3. ใน Visual studio เปิด Project ที่ต้องการ ต่อ SQLite และให้ ไปที่ Nuget Pakage Manager
 เลือก SQLite

4.  ทำการแก้ App.config

ชื่อ name ต้องตรงกับ File และ ใน Connection String ต้องตรงกับ ที่เก็บใว้
  <connectionStrings>
    <add name="myDb1" connectionString="Data Source=|DataDirectory|c:/temp/FormSQL/FormSQL/myDb1.db" 
         providerName="System.Data.SQLite.EF6" />
  </connectionStrings>

5. สร้าง Class สำหรับ SQLite file
  
using System.Data.SQLite.EF6;
using System.Data.Entity.ModelConfiguration.Conventions;

namespace FormSQL
{
    class myDb1 : DbContext
    { // set database(DbContext) and table (DbSet) <class> of table
        public DbSet<Customer> Customer { get; set; }
        protected override void OnModelCreating(DbModelBuilder modelBuilder)
        {
            modelBuilder.Conventions.Remove<PluralizingTableNameConvention>();
        }
    }
}

6. สร้าง Class สำหรับ Table


namespace FormSQL
{

    public class Customer
    {
        public string Id { get; set; }
        public string NAME { get; set; }
        public string SURNAME { get; set; }
        public string PHONE { get; set; }
        public double SALARY { get; set; }

       
    }
}

7. สร้างโปรแกรม ทดสอบ

 private void  testLinq()
        {
            var db1 = new myDb1();
            var aname = db1.Customer.Single(a => a.NAME == "MyName");
            aname.SALARY = 20000;
            db1.SaveChanges();
        }

แล้วดูผล จะเห็นว่า ใช้ Linq เรียก หา Record ที่ Name เท่ากับ MyName และเมื่อได้ Record Data มา ก็จะทำการแก้ไข โดย ตั้งค่า SALARY ใหม่ เป็น 20000 และ สั่ง SaveChanges() เพื่อ Update
ซึ่งเท่ากับ
การ Select * from Customer where Name='MyName'
และ Update Customer set (SALARY=2000 ) Where Name='MyName'

reference
https://github.com/JVimes/LinqSqLiteExample

// Add

  var db1 = new myDb1();
            Customer myname= new Customer();
            myname.Id="0071";
            myname.NAME = "Hello";
            myname.SURNAME="SSS";
            myname.PHONE="1234";
            myname.SALARY=100;
            db1.Customer.Add(myname);

            db1.Customer.Add(new Customer { 
            Id="009"
            NAME="Hellox"
            SURNAME="VA",
            PHONE="293993",
            SALARY=300
            });
            // commit

            db1.SaveChanges();

// Remove
   var db1 = new myDb1();
             var aname = db1.Customer.Single(a => a.NAME == "Hello");
             db1.Customer.Remove(aname);
             db1.SaveChanges();
//Select where
  var db1 = new myDb1();
            var ar1 = db1.Customer.Where(a => a.SALARY > 200).ToArray();
           
            dataGridView1.AutoGenerateColumns = true;
            dataGridView1.DataSource = ar1;
            dataGridView1.Refresh();


คำสั่งที่น่าสนใจ เช่น การ เปลี่ยน Datatable เป็น Array ด้วย Linq

  var result = dt.Rows.Cast<DataRow>()
                    .Select(row => row["columnname"].ToString())

                    .ToArray();

กรณีเป็น Dictionary
  var result = dt.Rows.Cast<DataRow>()
                    .Select(row => new KeyValuePair<string, string>(row["BomID"].ToString(), row["ChildID"].ToString()))

                    .ToDictionary(x => x.Key, x => x.Value);

วันพุธที่ 11 มกราคม พ.ศ. 2560

Compile Dotnet บน GStar Cad

GstarCAD  เป็น CAD จีนที่ ราคาไม่แพง เล็ก เร็ว 64bits ด้วย การเขียนโปรแกรม บน dotnet ทำได้เหมือนกับ Autocad โดยที่ GstarCAD 2017 (http://www.gstarcad.net) จะมี API แบบเดียวกับ Autocad 2012
โดยที่ จะต้อง reference Dll 2 ตัว
   ได้แก่ GMAP.dll และ GMDB.dll แล้ว (แทน acmgd.dll ,acmdb.dll)
แก้ Using
จาก Autodesk.Autocad.. -> GRxCAD...
ก็จะ compile ได้ และ เลือก เป็น Dotnet 4 (Autocad เป็น 3.5)
เรียก netload เหมือน Autocad เรียกคำสั่งเดียวกัน


วันจันทร์ที่ 9 มกราคม พ.ศ. 2560

autocad 2011-12 load โปรแกรม dotnet 4 สำหรับ Visual Studio 2013-15

Autocad 2011-12 พัฒนาบน Dotnet3.5 จะ Load โปรแกรมบางตัวไม่ได้ ที่ ต้อง Load Dotnet 4.0
สามารถ ทำได้ โดย แก้ที่ acad.exe.config

<configuration>
<startup useLegacyV2RuntimeActivationPolicy="true">
    <supportedRuntime version="v4.0"/>
  </startup>

<!--All assemblies in AutoCAD are fully trusted so there's no point generating publisher evidence-->
   <runtime>      
<generatePublisherEvidence enabled="false"/>  
   </runtime>
</configuration>